Accudemia: How do I enable SAML SSO (Single Sign-On) for my account?

For the Updated Version of Accudemia 10.0 Click the link below:
This new feature to authenticate users using the SAML protocols for SSO to simplify password management and increase security that will allow your students to log in to Accudemia from your college portal rather than a separate webpage/URL should be relatively easy to setup in Accudemia. Here's how:
Configuring Accudemia
- Log in to your school's https://<mycollege>.accudemia.net website using your domain in place of the <mycollege> and admin credentials provided.
- Now to enable this option, you can access the setup under the Administration > Control Panel > User Accounts section form the left-side navigation menu.
- In the User Accounts page of your Accudemia website scroll down to the SAML Single Sign-On section.
- Here you'll enable SSO by checking the checkbox labeled "Enable SAML SSO".
- You'll now need to set the Identity Provider URL, Public Certificate, and Logout URL to Accudemia so it knows where the Users will be coming from and directed after they log out. Optionally there are other things you can do if needed too such as an error page and alternate ID use (if uploaded into Accudemia specifically for SSO). Here is a sample of this completed:
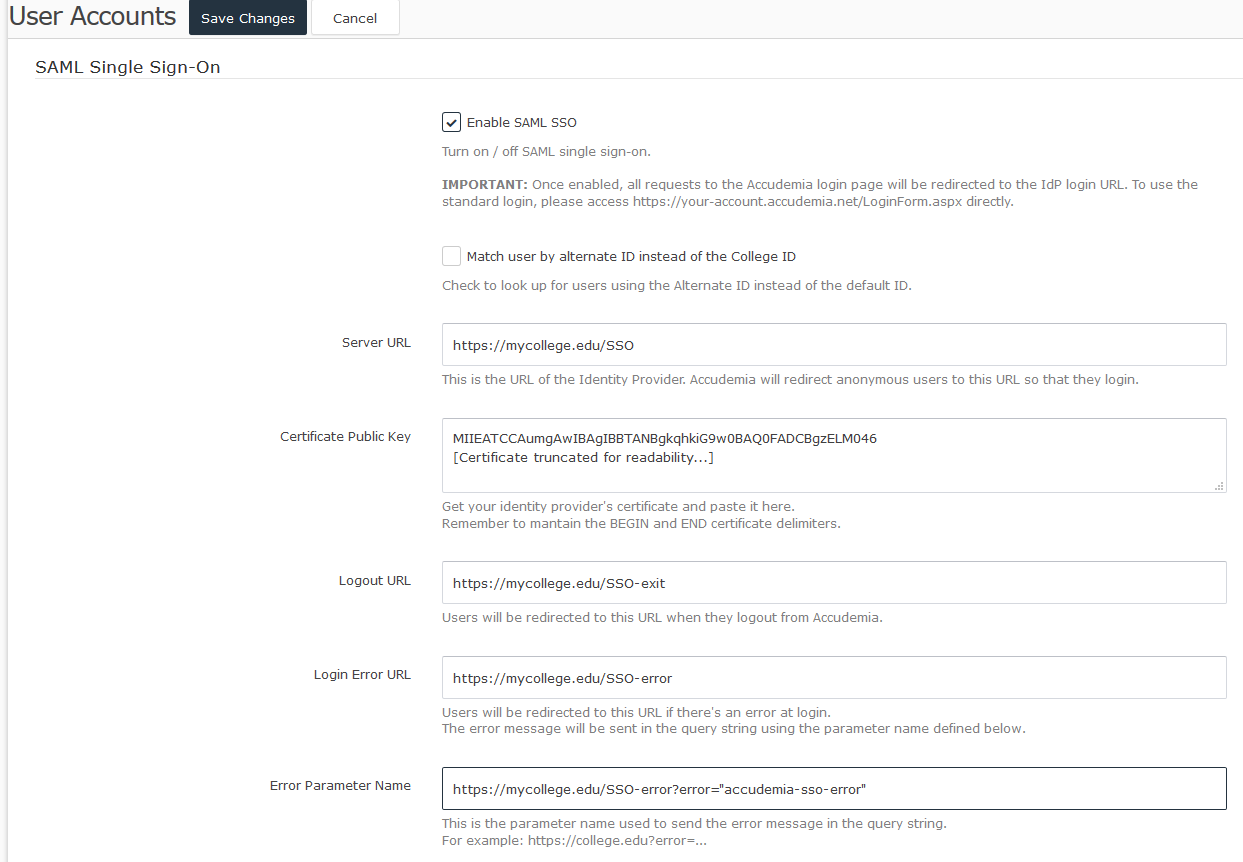
- After completing this section, please save this information at the top of the page by clicking the Save Changes button.
- Done! Now to test it go to your authentication portal that you have set up for users and log in using your credentials or with a test user account.
Configuring your IdP / SAML Server
To configure your Identity Provider (IdP), you need the Accudemia SAML Metadata. You can find it in:
https://<your-domain>.accudemia.net/saml/metadata.aspx
Once you have entered the metadata in your IdP, you need to set it up to send the user ID or alternate ID in the NameID field, under the Subject tag. It's important to note that the NameID doesn't have to be an attribute, but the tag is defined under the Subject node/tag in the XML. If you look at the SAML authentication request, it should look like this:
- <saml:Subject>
- <saml:NameID Format="urn:oasis:names:tc:SAML:1.1:nameid-format:unspecified">111-11-1111</saml:NameID>
- ...
- </saml:Subject>
Configuring Active Directory Federation Services (ADFS)
To send the NameID in the Subject tag, you need to go to AD FS Management, navigate to Trust Relationships > Claims Provider Trusts, then right-click on your provider and select Edit Claim Rules:
Then click Add Rule and add the following rules:
First, to send the LDAP attribute as a claim, create a rule of type "Send LDAP Attributes as Claims". Next, set the attribute you want to use to authenticate from your AD. For example, the Employee Number:
Then, create a second rule. This time, select "Transform an Incoming Claim." In another rule transform the NameID to the Subject:
For more information, you can also check this video:
For any questions regarding this new feature, contact our support team at support@accudemia.com or Submit a Ticket on this site.