Accudemia: How do I schedule an appointment online to meet with a Tutor on campus?
Introduction
Accudemia offers the ability to schedule appointments online to meet with tutors in person or virtually (if offered). This article will explain the simple steps to schedule an appointment.
Step-by-Step
1. Log into your Accudemia account following the instructions provided by your school.

The school should provide you with the link to log into Accudemia. It may look something like this "https://(Domain).accudemia.net" or be accessed directly from your school's portal.
2. Click the Schedule Appointment button in the Upcoming Appointments section on the Home screen (the default page that loads once logged in).
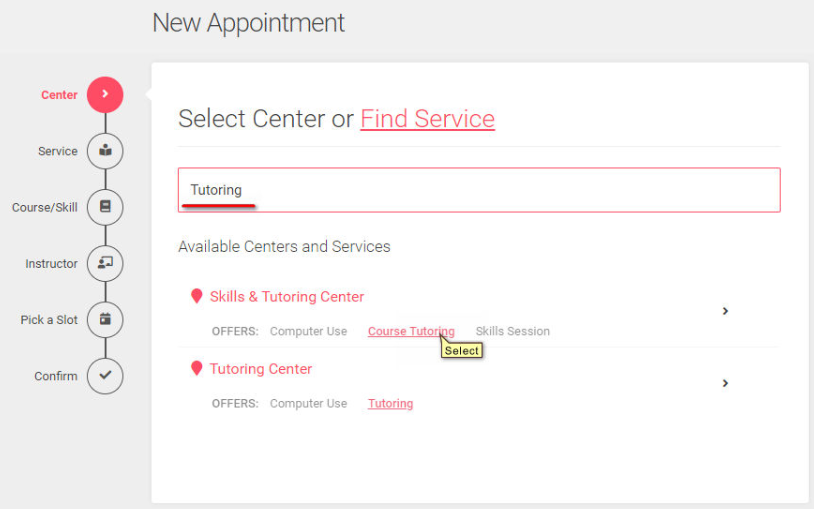
3. Search for the desired center or service to schedule an appointment on campus.

4. Next, search for and select the Course (if enabled or relevant).

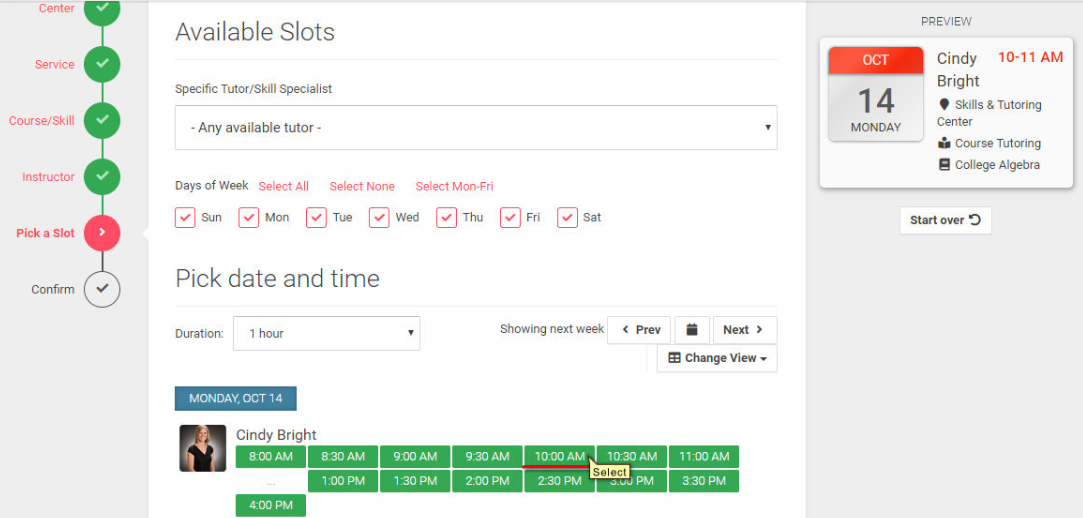
TIP: Notice how on the far right side of the screen it shows your selections to this point. You can click the Start over button to start at the beginning, but should you just need to go back to a previous step simply click on the step/option on the left-side list.
5. The system may also ask which instructor teaches your course during this process, but only if there is more than one instructor. Select the Instructor in the list and click Continue > or the > symbol next to the option.
6. Select a desired time slot from the list of available Tutors.

7. Leave any questions or concerns in the Notes textbox, schedule recurring appointments based on this appointment, and then click the Confirm button at the bottom of the screen to finalize this process.
8. A confirmation screen will appear, with the option to create an additional appointment by clicking the Create Another One button below this confirmation.
Related Articles
Accudemia: How do I enable online meeting links for tutor appointments?
INTRODUCTION This is a new feature that we've added to Accudemia to help with managing the tracking of online sessions. By following this guide, you will be able to: Enable a Custom Meeting link for Tutors Assign Tutors a meeting link in Accudemia. ...Accudemia: How do I troubleshoot appointments to find out why students can't meet with their tutors?
Introduction Managing appointments is a major functionality in Accudemia, but sometimes it seems like you cannot create appointments with specific tutors. This is usually due to restrictions, rules, and associations that have been set by ...Accudemia: How do I sign into in-person appointments as well as online tutoring appointments?
Introduction Appointments in Accudemia can be either face-to-face or virtual; the sign-in process for both is slightly different. This article will explain how a user would use a physical sign-in station for a face-to-face meeting, how to use an ...Accudemia: How do I set my tutoring schedule or availability for appointments?
Introduction Accudemia allows tutors to set their schedules. These color-coded schedules reveal when a tutor is available, as well as what services or courses they're open to helping with inside those time frames. This article will explain how a ...Accudemia: How do I integrate Google Meet?
Introduction Accudemia allows for the use of meeting links to conference programs, like Zoom and Google Meet. However, Google Meet doesn't use a static URL for their meetings, meaning a new URL has to be made for every meeting. This is done through ...